

Welcome to part 2 of my series on setting up Google Analytics from scratch. This chapter will focus on settings and toggles within the Google Analytics admin area. If you’re looking for tips on deploying your Google Analytics tracking code, head over to part 1 where we walk through how to do just that.
As a reminder, and a point we’ll keep coming back to throughout this series, data collected by Google Analytics is immutable – that is, it cannot be changed or edited in any way after the point of collection. This also means there is no way to “backfill” bad or missing data – if there is a gap in data collection, the gap will remain forever.
Takeaway: Getting it right the first time should be the top priority in deploying any analytics tracking – mistakes will stay with you!
Part 1 focused on the proper deployment of tracking code to mitigate coverage issues – here we’ll be focusing on setting up the analytics account to capture data in the cleanest way possible, minimizing data quality issues and allowing for actionable data analysis and website optimization down the road.
A Note on Account Structure
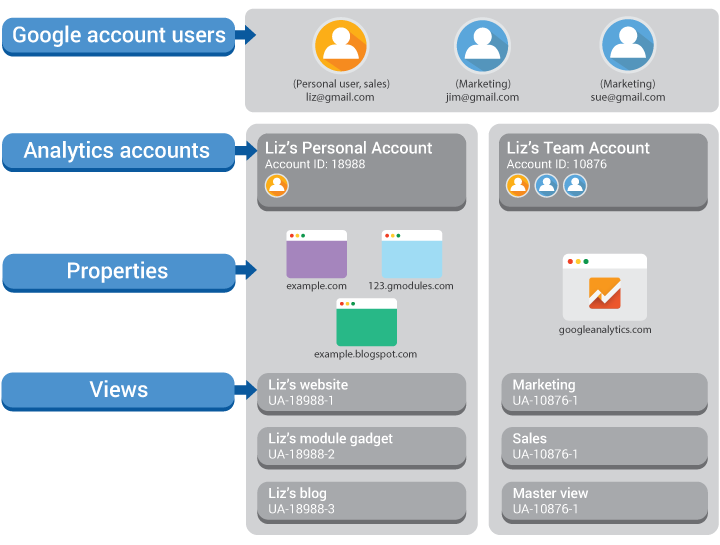
Simply put, an account is a collection of properties. You can think of each property as an underlying collection of datasets that most commonly correspond to the data collected for a single website or app.
While it’s possible to collect data from multiple websites and apps in a single property (such as in a cross-domain tracking setup), this guide will assume you’re setting up your analytics to track against a single website – that means one property.
The property is what generates a unique tracking code and ID, which we used to deploy our analytics pageview tag in part 1 of this guide. Each property also houses a collection of views – these are pre-aggregated sets of your data, and represent what you actually interact with when browsing reports in the Google Analytics interface.
More on these later – first, let’s dive into a few tweaks we’ll want to make in our property settings. (As mentioned in part 1 of this guide, leaving account settings “as-is” can lead to some problems down the road). These will apply to all views that we will later create within our property.
Google Analytics Property Settings

If you haven’t already, be sure to open up your Google Analytics Admin UI – we’ll be focusing on toggles in the middle ‘Property’ column to start.
Property Settings Tab
We’ll actually be making just a single tweak here – and that’s to turn on the ‘Users’ reporting metric:

TLDR: Toggle this guy on and hit save at the bottom of the screen.
A couple of years back, Google made some changes to how unique visitors are calculated – these changes are generally “good” because they decrease the volume of data Google needs to process, thereby decreasing the chance that a given report contains sampled data (a method Google uses to decrease the amount of processing that needs to happen to show reports – this can result in estimated data rather than actual data if a given report contains more hits than the threshold Google is willing to provide free of charge).
Unfortunately, this change in calculation method also has the effect of making it harder to determine how many unique visitors a site receives in a given time frame – turning this on forces Google Analytics to always calculate the actual number of unique visitors that correspond to a given reporting view, providing access to the ‘Users’ metric (what Google calls unique visitors).
Other toggles on this screen can be safely ignored for now (though I do recommend you create a Google Search Console account for additional insights on organic search performance, this can be done later).
Before we move on – I should touch on one setting that can be very much ignored: the ‘Use enhanced link attribution’ toggle:

This setting powers ‘In-Page Analytics’, an extremely useful report that was sadly deprecated several years ago. This report used to show heat mapped click activity for each of your pages, but was neglected by Google and left to die. Now, this setting survives in the “Property Settings” area seemingly just to confuse analysts and provide false hope.
Tracking Info – Data Collection
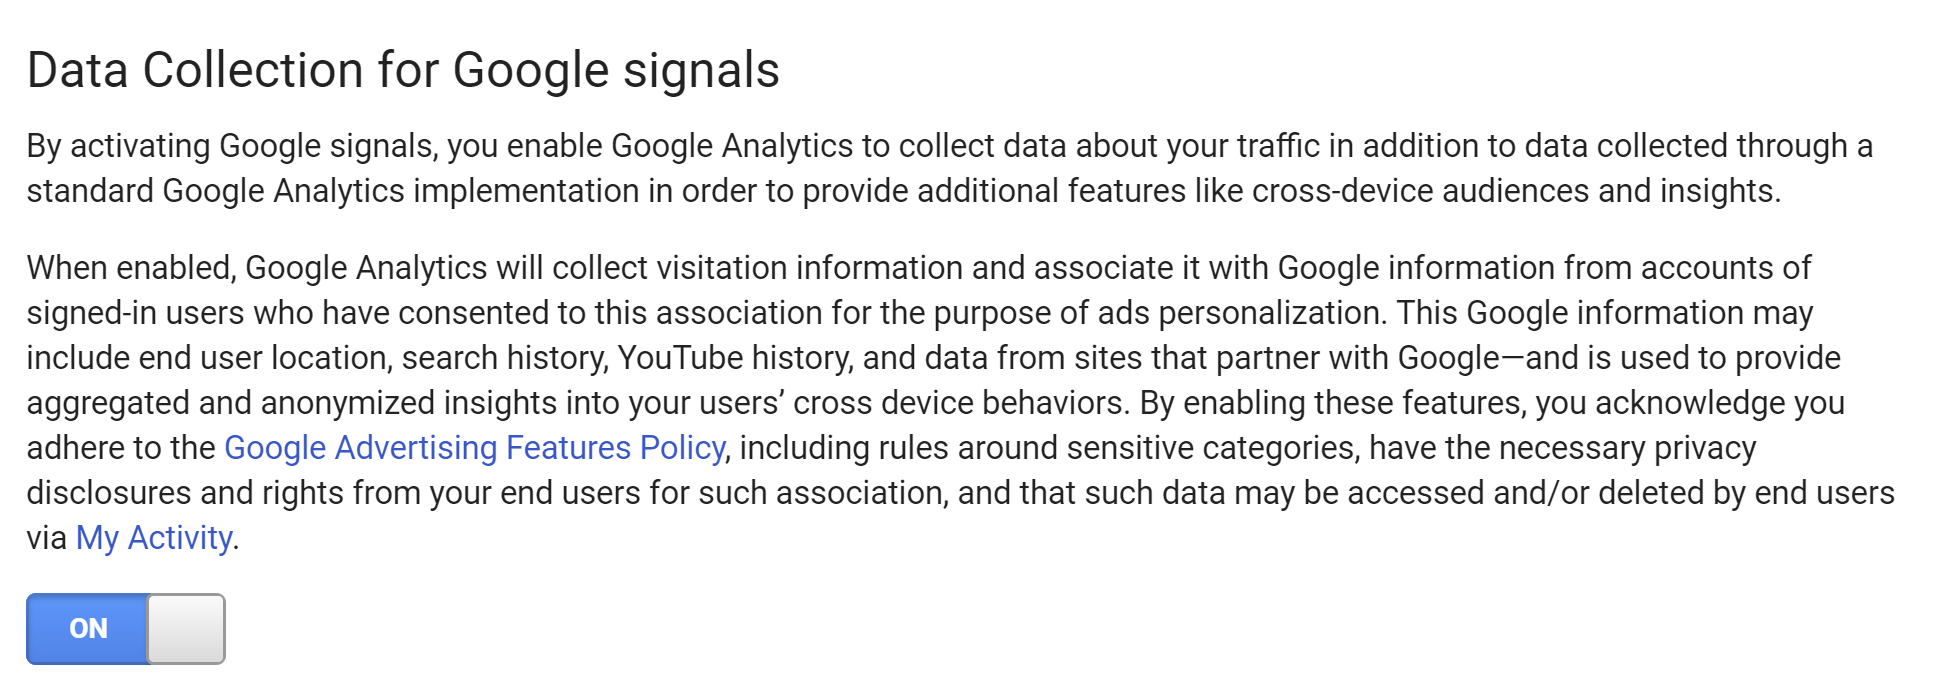
We’ll be making a few stops in the ‘Tracking Info’ area – first head over to the “Data Collection” tab, turn on Google Signals (make sure to review the terms on privacy and disclosures), and hit save.
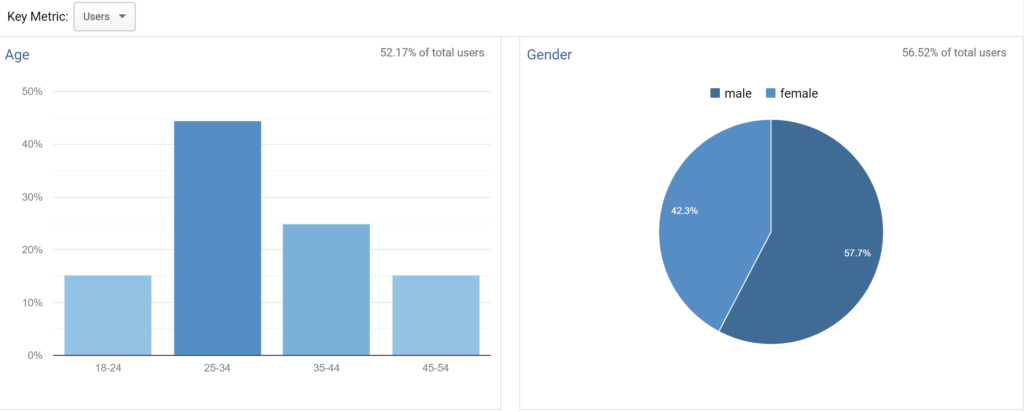
Google Signals powers several insightful audience reports (and audience targeting capabilities when paired with Google Ads). The first is a set of demographic reports that provide information (really just educated guesses based on data collected via 3rd party cookies) on the demographic makeup of your visitors, including their age, interests, and likely “in-market” categories (what they’re interested in purchasing):
The second is a set of “cross-device” reports, showing how visitors to your site use different devices to find and interact with content:
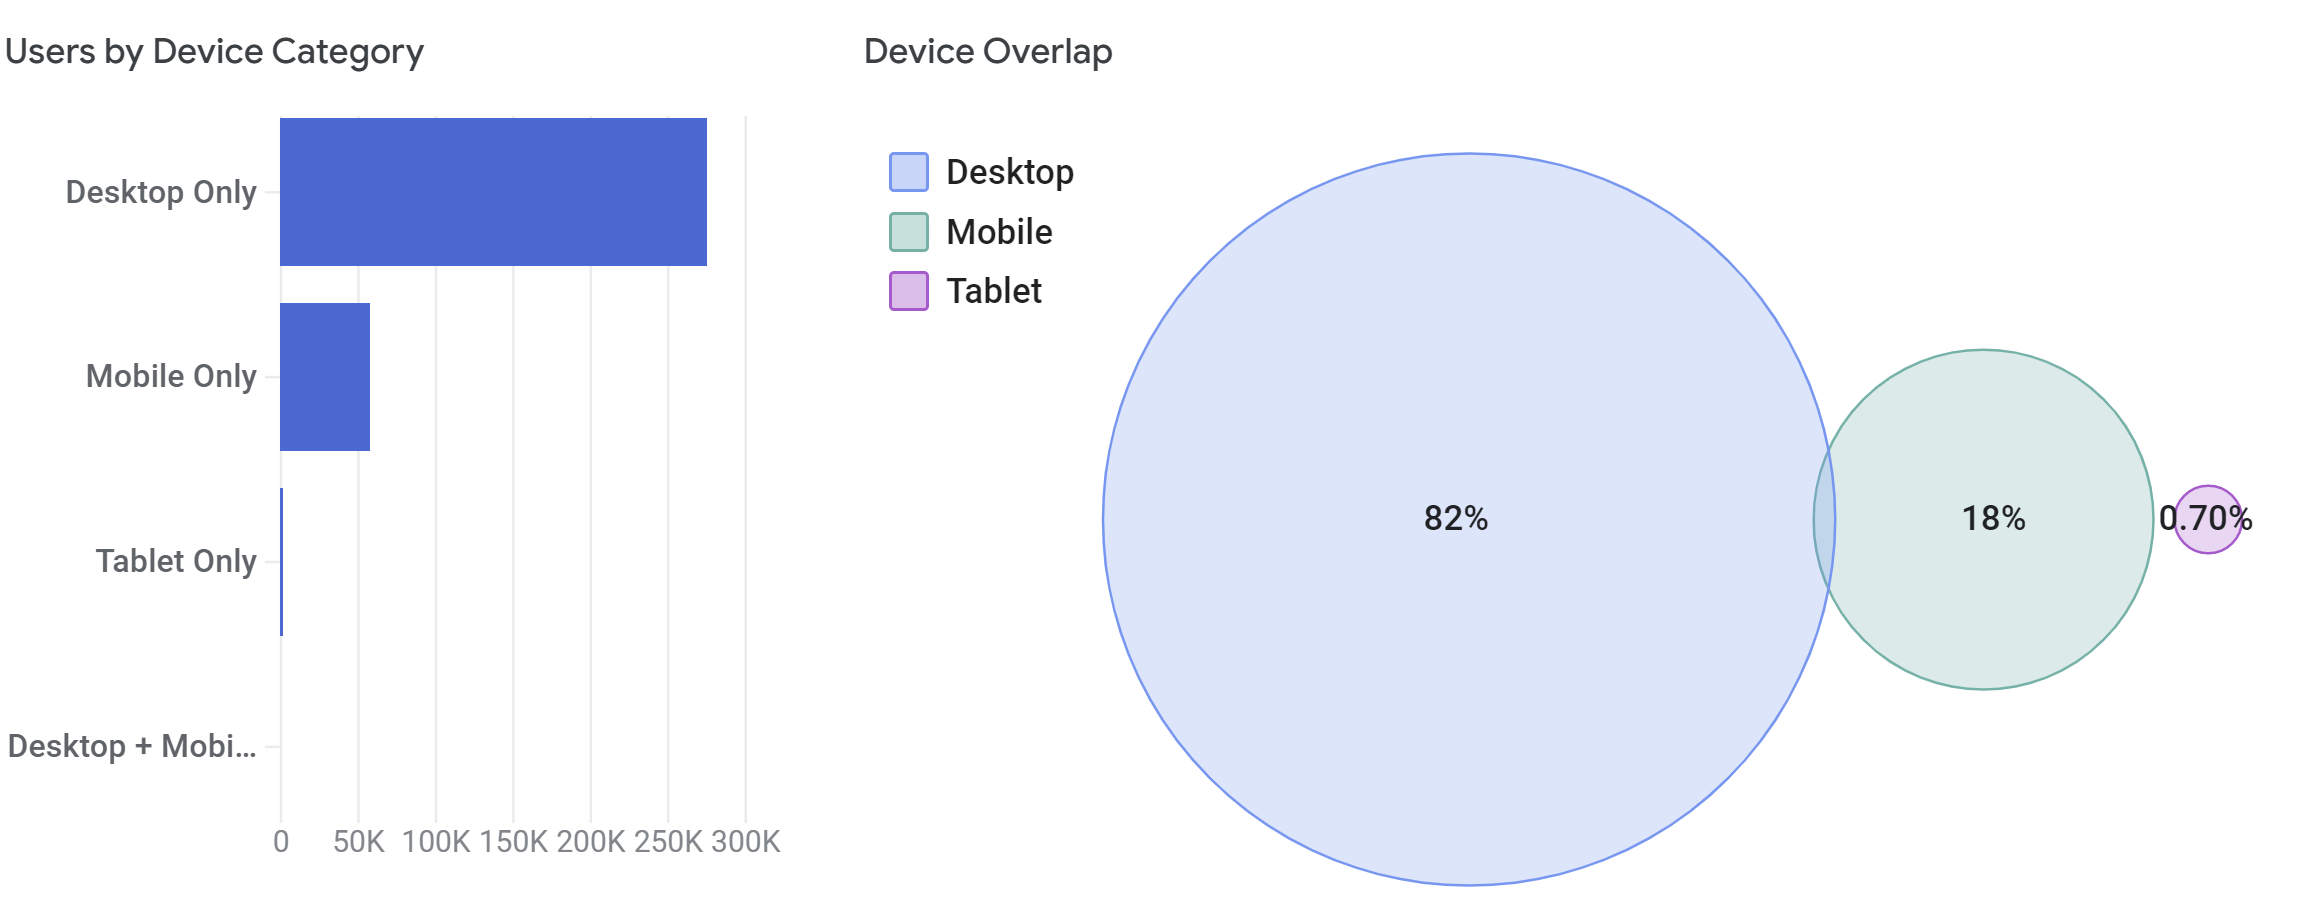
This second set of reports is especially worth considering. Remember that ‘unique visitors’ as defined by Google Analytics are actually just unique cookies. If the same individual visits your site on 3 different devices or 3 different browsers on the same device, this will look like 3 unique visitors to Google Analytics – even though the visits all came from the same person!
Historically, unless your site had a sign-in feature where visitors could authenticate to allow for User-ID based reporting, cookies have been the only way to roll up visits from the same “user”. That’s until Google Signals was introduced!
Google Signals rolls up anonymized data from users that have signed in to Google Chrome across multiple devices – allowing Google to stitch visits from those users together and de-aggregate to show how the same individual might interact with your site in a cross-device context.
Alongside providing a more realistic picture of how visitors are engaging with your website, this also opens up some interesting advertising capabilities on the Google Search & Display networks: for example, allowing you to target advertising to users on mobile devices that may have found your website via desktop.
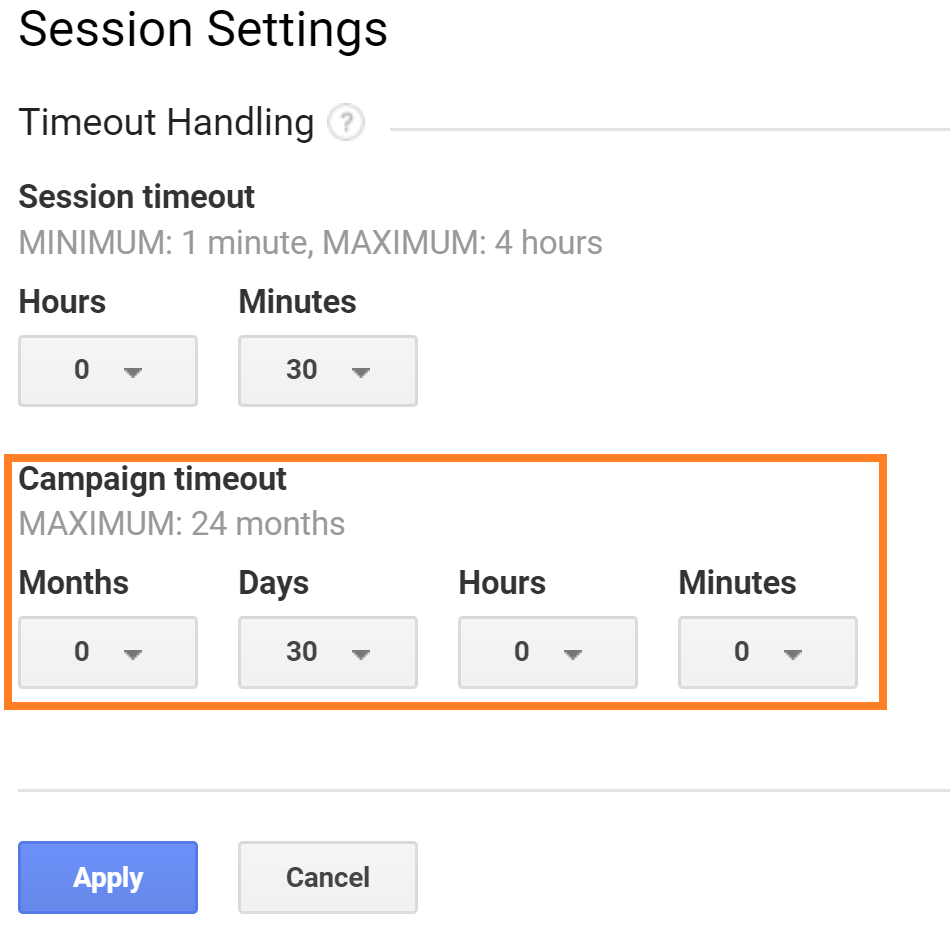
Tracking Info – Session Settings
Our next stop is the session settings tab – here we’ll be making just a single adjustment: change the ‘campaign timeout’ from the default 6 months to 30 days:
This one may be a bit controversial and deserves some explanation. By default, most reports in Google Analytics use a ‘Last Non-Direct Click‘ attribution model.
Attribution modeling can be a tricky and problematic topic, particularly in the context of digital advertising. In brief, “attribution” is the process that Google Analytics uses to determine which digital marketing channel should get the credit for driving a visit, as well as the credit for any “conversions” (such as a purchase or lead form submission) that might occur during that visit.
A “Direct” channel visit suggests that a visitor came to the site by typing in the website address directly into a browser URL bar. In reality, it means that Google Analytics doesn’t have any information about how that visitor got to the site, and so assumes it must have been by typing in the address – but that’s a separate topic.
The “Last Non-Direct Click” attribution model means that if Google Analytics knows something about how a visitor previously found the site, that prior channel touchpoint gets the credit. With the default 6-month campaign timeout window, this can create some very misleading data.
Let’s consider the following scenario:
- On January 1, 2020: Sarah initiates a Google.com search for “How to set up Google Analytics”, finds this amazing article, and clicks.
- At this point, Google Analytics registers a single visit attributed to the ‘Organic Search’ channel.
- At this point, Google Analytics registers a single visit attributed to the ‘Organic Search’ channel.
- On May 31, 2020: Sarah decides to check up on her favorite blog and comes back to maxsconsulting.com via a Direct visit. At this point, Sarah decides she has some questions and decides to get in touch via the site’s contact form.
- Because we are inside the default 6-month campaign timeout window, this second visit also gets attributed to Organic Search. Google Analytics shows 2 visits from the ‘Organic Search’ channel for this timeframe. Critically, because our site is tracking contact form submissions as a ‘goal’, this lead also gets attributed to the ‘Organic Search’ channel.
Over many visits, this can be problematic and deceiving – if someone first found our site via a Google Ads click 5 months ago, why should that click get credit for a ‘Direct’ channel interaction today? Isn’t it more likely that something else, perhaps a banner ad that didn’t actually receive a click, drove the more recent interaction?
There is a danger here in over-attributing the success of marketing initiatives, potentially leading to a misallocation of marketing dollars to what appears to be a “highly performing” channel at the expense of other unrecognized efforts.
For this reason, I personally err on the side of shortening the campaign timeout to 30 days – even this is probably a bit too long (and an argument could be made to use the time lag reports to zero in on a realistic approximation for your particular site), but I find it to be a more believable and actionable attribution window than the default setting.
Tracking Info – Referral Exclusion List
If you’re setting up a brand-new Google Analytics account in 2020, chances are you won’t need to do anything here aside from sanity checking that your root domain is listed as an entry on the ‘Referral Exclusion List’:

In prior versions of Google Analytics, tracking across subdomains on the same domain posed self referral attribution challenges. Visits that crossed from one sub-domain to another (e.g. blog.example.com vs. shop.example.com vs. www.example.com) risked overriding the actual referring channel.
For example, a Paid Search visit that started on www.example.com and crossed over to shop.example.com to complete a purchase would show the purchase attributed to a referral visit from ‘www.example.com’, rather than to the Paid Search click that drove the visit from google.com.
Google’s Universal Analytics solves this issue by re-writing referrals that occur on the same root domain to ‘Direct’, thereby ignoring the referral and preserving the original marketing channel in the attribution model.
That said, if you plan on setting up analytics in a cross-domain context, or if your website features login or payment portals that redirect to a 3rd party vendor before continuing on your own site (Paypal is a common example), these 3rd party domains should be added to the referral exclusion list as well.
Wrapping Up
This chapter focused on property settings – these are critical high-level toggles that govern how information is collected and passed to our actual reporting interface, the views in Google Analytics.
Our next chapter will focus on ideal settings for those views – if you’re looking for information on how to deploy analytics tracking code, be sure to check out How to: Google Analytics Setup From Scratch (Part 1).