

Welcome to part 3 of my series on setting up Google Analytics from scratch. This chapter will focus on setting up several standard views for consuming your website analytics data.
Starting from the beginning? Head over to part 1 to learn about deploying analytics tracking code – otherwise, read on to learn about Google Analytics views!
As a reminder, views in Google Analytics represent pre-aggregated collections of your website (or app) analytics data and comprise the actual interface between you, the analyst, and Google’s data collection endpoints. Check out part 2 of our guide for an overview of the Google Analytics account hierarchy, including property and view concepts.
What Exactly is a View?
When you browse reports in the Google Analytics interface, you are not accessing the actual raw data collected by Google. Instead, you’re browsing pre-aggregated sets of your data, which are presented only after any modifications or filters you might define are applied. We’ll be getting into exactly what those modifications mean in just a moment – the important takeaway here is that a view is a window through which you consume insights.
Pre-aggregated is an important concept to touch on at this point. When a ‘user’ (uniquely identified cookie or User ID) browses your website, all sorts of information is collected about that user’s interactions, including what marketing channel drove the website visit, what pages were viewed, the length of the visit, and meta attributes such as the user’s browser version and geolocation.
When viewed in a typical Google Analytics report, this wealth of data is not available at the level of an individual ‘hit’ (an individual measured event) – instead, the data for all website users, their many visits, and the patterns of behavior across your website are aggregated to provide a narrative of general behavior. This is done both for privacy reasons as well as in the service of computational efficiency: providing the raw data for all website users for all Google Analytics accounts would be computationally expensive for Google.
Note: it is possible to access raw (hit-level) data collected by Google Analytics, but this is only available to GA360 customers via BigQuery. (This feature is also currently available to all users, including free users, of the new App + Web property type, but since this feature is currently in beta, we don’t address it in this article).
As a consequence, data is collected and processed prior to becoming available in a report – this can take anywhere from several hours to a full day. For this reason, it’s typically a best practice to avoid looking at data for the current day, because same-day data is likely not fully baked, and may change after processing is complete.
With very few exceptions, the processed data is ‘final’ (immutable, as noted in Part 1), meaning that it cannot be changed after the fact. Part of that processing workflow is defined by you in the actual ‘view settings’ in Google Analytics – and that’s what we’ll be diving into next.
Creating Your First Views

If you’ve been following this guide from the beginning, you’ll likely be looking at an Admin page with just one view at this point, called ‘All Website Data’.
Assuming you haven’t made any modifications to view settings yet, our first order of business will be to enter the ‘View Settings’ panel and rename that to something like ‘z_backup – do not modify’:

Creating a backup view is a good best practice because it allows for a clean, unaltered “out of the box” version of your website data as collected by your Google Analytics property. Think of this as a fallback in case you ever need a clean reference for QA purposes down the road.
We won’t be making any further changes to this backup view at this point – instead, we’ll be making edits to additional ‘primary’ views going forward.
Go ahead and click that ‘+ Create View’ button and spin up a new view – I recommend calling it something like ‘001 – yourdomain.com’.
Sidenote: the reason for these naming conventions (eg. 001, z_backup) is because Google Analytics lists your views in alphabetical order – so with these prefixes, your backup view will always appear at the bottom of the list, and any “working” views starting with ‘001’, ‘002’ etc. will appear at the top.
Basic Settings
Let’s walk through a few key toggles in the ‘Basic Settings’ section:
Time Zones

Take the time to set your timezone – this is important because it determines how dates are partitioned in your Google Analytics reports, and also impacts session rollover settings. Specifically, sessions (visits) that start at 11:59 PM will automatically end at midnight and a new session will start for any hits collected once the clock hits 12:00 AM in the current timezone.
You don’t want your afternoon visit metrics to be double-counted because of an incorrectly set timezone.
Query Parameters
Query parameter exclusion is potentially the first area where we’ll be making modifications to the way data is collected and stored in our Google Analytics view. Consider the following two landing page URLs:
- www.example.com/
- www.example.com/?fbclid=12345abcde
If you’d ever worked with advertising on Facebook this will look familiar – both URLs resolve to the same page on example.com, but the second contains a tracking URL query parameter from a Facebook ad.
The trouble is Google Analytics doesn’t make this distinction on its own, and so the result is that these two URLs will be treated as different pages by Google Analytics, each accumulating its own set of metrics on the number of times the page is viewed, the average time spent browsing the page, etc.
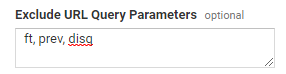
This is, to state the obvious, not good – and it makes your website data more difficult to interpret and action against. Luckily, Google Analytics does have a way to combat this issue: the ‘Exclude URL Query Parameters’ area in basic view settings. All you need to do is enter a comma-separated list of any query parameters your site may be using here, and Google will automatically ‘strip’ them, preventing these parameters from appearing in page reports.
Note: This recommendation assumes any stripped parameters don’t actually correspond to changing content on your website – if the content displayed on ‘page.com/some-page/?a=abc’ is different from the content displayed on ‘page.com/some-page/?b=xyz’, then it probably makes sense to continue treating these as different pages.
Bot Filtering and Site Search
It’s a fact of life that much of the internet is spam. Google Analytics has a provision to limit some of that spam from appearing in your reports – use it 🙂

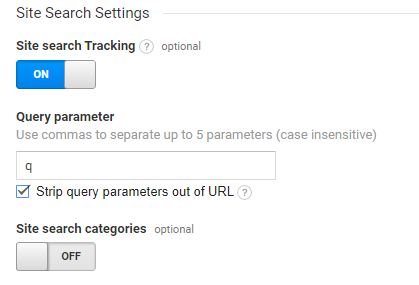
If your website has an internal search feature, you can explore that search data in Google Analytics – this includes the search term, the page on which a search was initiated, and the corresponding impact on behavior metrics like ‘pages / session’. Conversion rate optimization and user experience topics are outside the scope of this article, but suffice to say that site search plays an incredibly important role in maximizing your website’s impact.
Using the feature is fairly self-explanatory – just enter the query parameter that contains the search term for your particular site here, and Google Analytics will do the rest. For example, if your site search output looks something like ‘www.example.com/?search=xyz’, you would want to enter the parameter ‘search’.
Some Recommended Filters
“Filters” are a bit of a misnomer in Google Analytics – they do more than simply ‘filter out’ data (though using them for filtering out data, such as excluding internal company visits, is a common use case).
Put simply, filters are a method of modifying data at the point of collection, before it is stored in the tables that represent Google Analytics reports. As with all data collected by GA, data modified in this way cannot be modified after the fact – so why do it?
There are a number of reasons, but the most critical (and in my opinion, mandatory) purpose is to ensure that all the named entries in your reports, such as campaign names and page URLs, use the same casing – that is, specifically lowercase.
Imagine that you run a campaign called ‘Summer Sale’ – you diligently tag all of your campaign links with the ‘Summer 2020’ name, anticipating that you’ll later run a report to analyze campaign performance. One month down the road, you take a look and see something like this:
- Summer Sale – 20 visits
- summer Sale – 15 visits
- Summer sale – 10 visits
- summer sale – 30 visits
What’s going on? As with query parameters and page URLs discussed earlier, Google Analytics treats different cases of the same campaign name as different campaigns. The same holds true for page titles, URLs, etc.)
Lowercase filters allow us to sidestep this potential issue entirely, by ensuring that all campaign names (and a few other fields) are automatically converted to lowercase at the point of collection, ensuring uniformity down the road when we conduct analysis.
Creating a lowercase filter is straightforward – I’ll let the screenshot do the talking:

I strongly recommend repeating the process and creating lowercase filters for each of the following fields:
- Hostname
- Request URI
- Campaign Source
- Campaign Medium
- Campaign Name
- Campaign Content
- Campaign Term
Optional: Display Hostname Filter
If your site uses multiple subdomains, such as blog.example.com, shop.example.com, and www.example.com, this is for you.
By default, ‘landing page’ and ‘page’ reports in Google Analytics list just the page path. For example, ‘www.example.com/somepage’ appears in reports as ‘/somepage’. The hostname can be added as a secondary dimension, but this is cumbersome.

Instead, we’re going to create an additional filter that will prepend the hostname to the page path, so that our reports look like this:

This is accomplished via an ‘advanced’ filter using the following settings:

The funky syntax here uses regular expressions to rewrite the ‘Request URI’ field (which is the field used in page and landing page reports) to the format “[hostname][request uri]”.
You Made It!
Congrats – if you’ve made it this far, you’ve now got yourself a clean, new Google Analytics account, property, and starter views – well on your way to collecting actionable intelligence on website visitors.
Is there more to do? Of course! So much more! In future entries, we’ll be exploring methods to enhance data collection for interactions such as clicks on calls to action, scroll depth metrics, and form submission tracking to name just a few.