

As an analytics practitioner, I’ve seen a lot of Google Analytics implementations. No two are ever alike – but the vast majority of deployments do have some things in common in terms of the issues present, and the mistakes made during setup.
These mistakes are often small, easy to miss, and can lead to enormous problems down the line because …
Google Analytics Data is Immutable!
What do we mean by immutability in this case? Simply put: with very few exceptions, the data collected by Google Analytics cannot be changed after the fact. This is, depending on your point of view, either a huge benefit or a critical failure in the analytics data model.
A classic example of this issue is casing: ‘someCampaign’ and ‘SomeCampaign’ are treated as two different campaign names in Google Analytics because campaign names are case-sensitive. This means if you’ve made a typo when handing out campaign links to partners at some point, you’re going to be living with the consequences of that typo (and the analysis headaches it causes) in perpetuity.
Takeaway: Because data in Google Analytics is immutable, it’s critically important to launch tracking with best practices in place – there is no easy way to ‘clean’ the data later, and absolutely no way to go back and fill in data that was missing due to an implementation error or omission. But hey, that’s why you’re here … right? 🙂
What to Look Out For
Typically, implementation mistakes fall into one of these categories:
- Architecture: The implementation and deployment of the analytics tracking code, and how that leads to poor (or even missing) data.
- Account Settings: Unfortunately, leaving things as they are ‘out of the box’ often leads to a host of issues, meaning this isn’t really an option for the majority of deployments.
- Conversion Tracking: What is a conversion? How is success measured on our website? How does that relate to digital marketing efforts that occur off the site, and how does that translate to customer activity that we measure offline? This is a common miss.
- Data Quality: Ok, I lied. This isn’t a real category, but it’s where mistakes in the above three areas will manifest and show themselves.
In this three-part series, I’m going to show you how to hopefully avoid some of the most common issues made in deployment, and empower you to answer business questions with website analytics data down the road.
Note: If you haven’t already, this is a good time to sign up for a free Google Analytics and Google Tag Manager account.
A Foray Into Tag Management
At this point, I’m going to take an aside and implore you to deploy your analytics code, and everything else possible for that matter, via a tag management system (TMS). While there are a number of deployment methods available for Google Analytics, we’re going to be focusing on deploying via Google Tag Manager here.
If you’ve taken a peek at the Google Analytics Admin UI, you may have noticed that the default recommended deployment method, by Google, is the ‘Global Site Tag’ (gtag.js), with the Google Tag Manager (GTM) option taking a lowly backseat:

I won’t get into speculation about why Google is pushing for a direct code implementation here, but I’m more than happy to talk about what I see as the major benefits of using a tag management system:
- Centralized Code Deployment: Today you might have just a standard Google Analytics pageview tag. Very soon, if you’re following this guide, you’ll likely have additional event tracking tags, and, as your marketing and tracking framework evolves, you might start adding tags and pixels from other platforms.
All of this becomes very difficult to keep track of (not to mention, error-prone) when everything is deployed directly via your site’s HTML template (or some other global ‘include’ file). Decentralized deployment also introduces the opportunity for versioning errors – this is what happens when parts of your website use different versions of analytics code (that are not always directly feature compatible).
The additional overhead alone is a great argument for centralizing all analytics deployment under a tag management solution.
- Decoupling Website Architecture From ‘Tagging’: Using a tag management system means that analytics code and advertising tags can be deployed outside of a web development framework. This means that (ideally), web developers can spend their time web developing, instead of trying to fit analytics code deployments into their workflow.
Conversely, this allows for greater flexibility on the marketing and analytics side: analytics code deployment can be managed directly via TMS, without the need to go through a development sprint. In most cases, this translates to a dramatically faster time to launch (and time to value!) for any associated marketing initiatives. - Third-party and Custom Code: The standard ‘Global Site Tag’ deployment is a workable (though as I argue above, unwieldy) solution if you’re planning on sticking to the Google ecosystem. Under ‘gtag.js’, it’s easy to link together Google products, including Google Ads, Google Analytics, and Google Optimize – but as soon as you move outside of that (say, to LinkedIn), you’re back to managing multiple tagging deployments and decentralized management.
- Rules-based Code Deployment: What happens if you want to deploy your analytics tracking code on a specific set of pages (say, our product pages), but not on other pages (say, in our web app)? What happens when you want to track link clicks on page A, but not on page B?
Working through these types of exceptions in a content management system (CMS), or worse, via direct FTP edits, is a mess. A robust TMS makes handling these distinctions a breeze.
Takeaway: Use Google Tag Manager (or a tag management system of your choice) to deploy Google Analytics – and steer clear of the gtag.js implementation method unless you don’t have any other choice.

Google Tag Manager Setup
There is a lot of great material on how to create a Google Tag Manager account, including Google’s own support docs, so we won’t be going into too much detail here.
Instead, we’ll be focusing on what to do once you’ve got your account set up and ready to go, so without further ado:
Publish a Version!

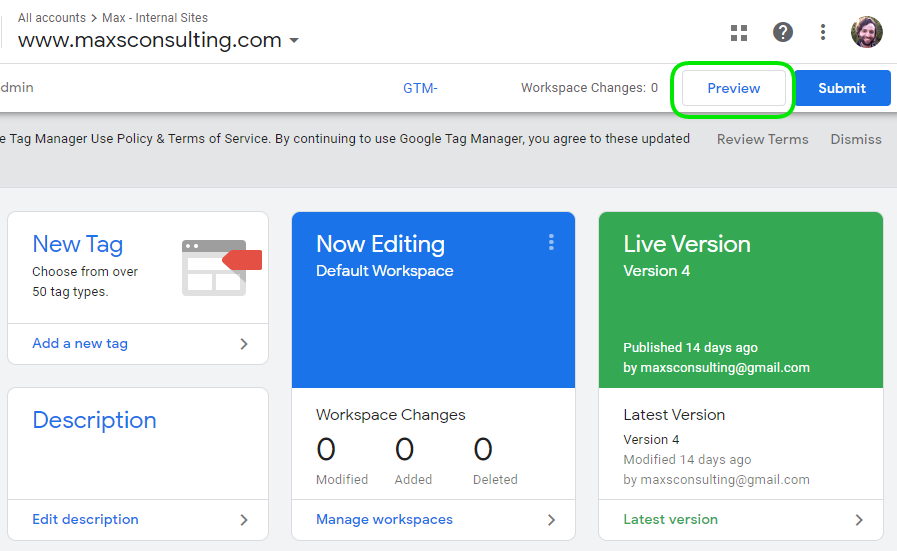
The very first thing we’re going to do is hit the submit button and publish a version! (I usually call this first one something like ‘Initialize Container’.
Note: ‘Publishing’ in Google Tag Manager means pushing code live.
Huh? We haven’t done anything yet – we haven’t even added GTM to our site yet, so why are we publishing “changes”? Mainly so that we don’t piss off any web developers. In a nutshell, the GTM container code we’ll be adding to our website includes a network call to Google’s servers, using our unique ID (‘GTM-XXXXXX’) as the endpoint.
Until we publish a version, that endpoint doesn’t exist – that means our web browser will be throwing errors every time a page loads (and our developers won’t be happy). Although any hypothetical errors will be showing up in the browser ‘console’, not anywhere visible to the end-user, this still makes for a messy deployment.
It’s generally a good idea to get this step out of the way before actually adding the GTM container code to a website.
TLDR: Publish a version before doing anything else, avoid awkward conversations later.
Add the Container Code to Your Website
A Google Tag Manager ‘container’ is the collection of tags, variables, and rules that are associated to a unique ID. One account can have many containers – creating multiple containers could make sense if you are managing multiple websites, or if you plan to partition off parts of your site from one another to run as separate entities.
For now, we’re going to assume that you’ll be managing your website under a single container – this is the most common use case. To access the container code, click the ‘GTM-XXXX’ link at the top-right of your UI and follow the instructions (or work with your web developer) to get this code added to your site:

Important: Because we’re deploying our analytics tag via Google Tag Manager, the Google Tag Manager code must be added to every page on our website that we care to track. If any page doesn’t include GTM code, we won’t be able to track interactions on that page – representing a gap in our ability to leverage analytics data.
Create a Settings Variable
If you haven’t worked with Google Tag Manager or Google Analytics previously, this step is going to seem pretty esoteric – take it on faith for now that creating a settings variable is going to save us some headaches down the road when we start setting up tracking for things like scrolling, CTA clicks, and form submissions (none of which are tracked by default).
For now, navigate to ‘Variables’ in the left-hand panel, scroll down to ‘User-Defined Variables’ and hit “New”. Here we’re going to select the Google Analytics Settings variable type.

We’ll name this variable gaSettings for short (you can name it anything you want), leave the ‘Cookie Domain’ to “auto”, and paste in your Google Analytics property ID:
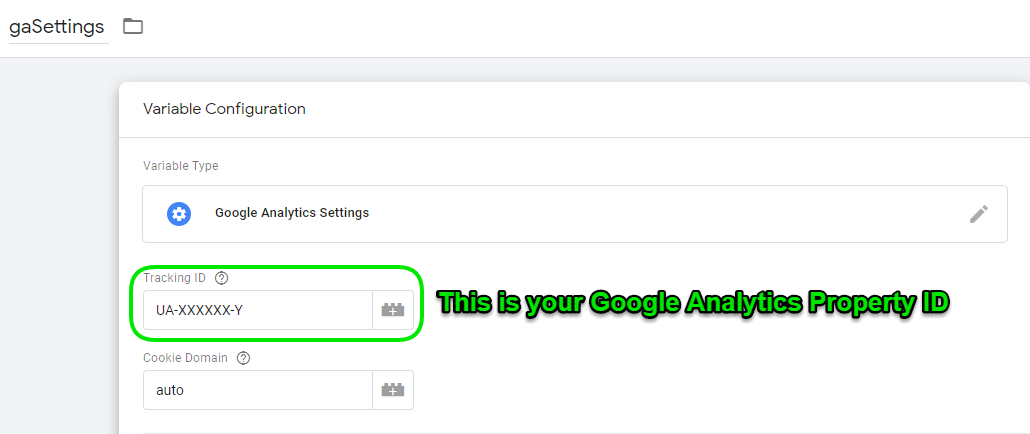
If you’re not sure where to grab your property ID, log in to your Google Analytics account and navigate to the Admin section. Your property ID will be displayed at the top of the ‘Property Settings’ column:

Create a Google Analytics Pageview Tag
At the risk of a serious digression, we need to quickly note that today, in 2020, all website analytics tracking is based on the concept of a ‘page’ object.
When we examine website analytics data, and in particular data in a Google Analytics Web property, what we are exploring is how our visitors interact with various pages on our site, and (if we’ve gone the extra mile with some additional setup) what elements our visitors are engaging with on each page.
This framework is admittedly a bit limiting – for example, what is a ‘page’ in a single-page app? How do we differentiate different ‘screens’ in a seamless experience? We’ll address these topics in a separate post – for now, if you’ve got a “traditional” website with different content hosted on each page, this approach will serve you well.
Back to our Google Tag Manager UI: Navigate to ‘Tags’ in the left-hand navigation panel and select ‘New’. From here we’re going to click in to the ‘Tag Configuration’ panel and select the ‘Google Analytics: Universal Analytics’ tag template:

This is the tag that’s going to do most of the heavy lifting when it comes to tracking visitors on our website. You can name it whatever you like, I typically call this one ‘GA – Main – PV’ (‘GA’ for Google Analytics, ‘Main’ meaning our main tag that does most of the work, ‘PV’ for Pageview).
Make sure the ‘Track Type’ is set to “Page View”, and that you’ve selected the analytics settings variable we created earlier from the dropdown:

Lastly we need to add a ‘Trigger’ to our tag. Triggers are rules that GTM uses to figure out when tags should fire – in this case, we want our tag to fire on every page, so we’ll be selecting the built-in “All Pages” trigger. We’ll be creating some additional custom triggers to do fancy stuff very soon 😀
Here’s how the completed tag should look (click to enlarge):

QA Your New Tag
We’re almost ready to publish changes – but before we do, it’s always a good idea to make sure everything is working as expected.
I’ll be going into detailed Google Analytics & GTM QA in a separate post, this one will be a brief example. For now, let’s hit the “Preview” button – this will load the current changes in GTM into your browser, meaning the edits won’t be live for any other visitors to your site.
With preview mode enabled, open up a page on your website – you should be looking for two things.
- The ‘preview mode’ overlay – if this is missing, it means the GTM container code is not present! Make sure you’ve got that added.
- Our ‘GA – Main – PV’ tag is showing up in the ‘Tags Fired’ section of the window:
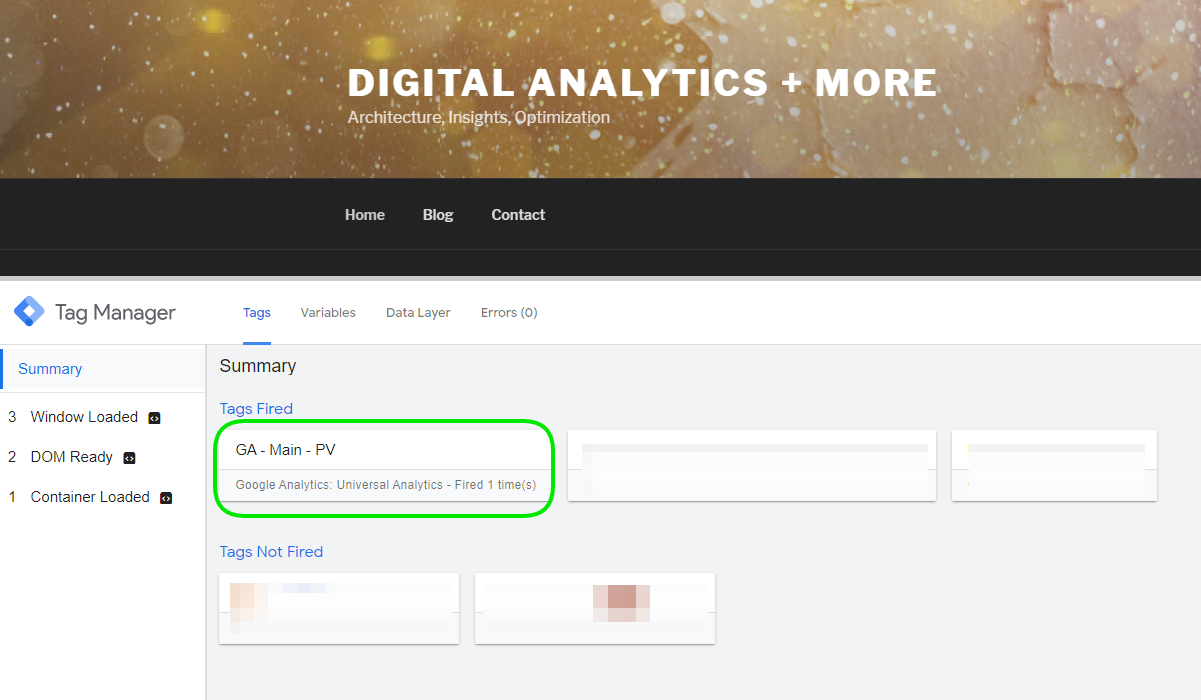
If you’re seeing something similar – congratulations! You’re ready to publish your changes in Google Tag Manager (and this time, they’re real changes!).
Recap and Coming Up
We’ve done a lot! So far, we’ve:
- Published an initial container version
- Added GTM code to our site
- Created a Google Analytics ‘settings’ variable and added that variable to…
- Our new Google Analytics pageview tag, which uses the built-in ‘All Pages’ trigger.
- QA’d our changes and published our first Google Analytics tag!
At this point, your Google Analytics property is officially collecting data from your newly minted Google Tag Manager tag. If you take no further action at this point, you’ll still have a wealth of data to explore and analyze in a few days and weeks depending on the volume of traffic your site receives.
You’ll also doubtless have a lot of junk and missing data – so of course, we’re not going to stop here!
Ready for more? Continue on to Part 2, where we’ll be diving into best practices for setting up your Google Analytics account.